The Great Hatchling Hunt level 5 - where to go?
Hello Dragon Ladies and Lords! In my previous post I explained what is the best order of opening chests in castle event and why is minimizing the expected value of key finding cost is better than minimizing total cost of route. I will not post this explanation again, so if you don't understand why does it even matter, go to my previous post.
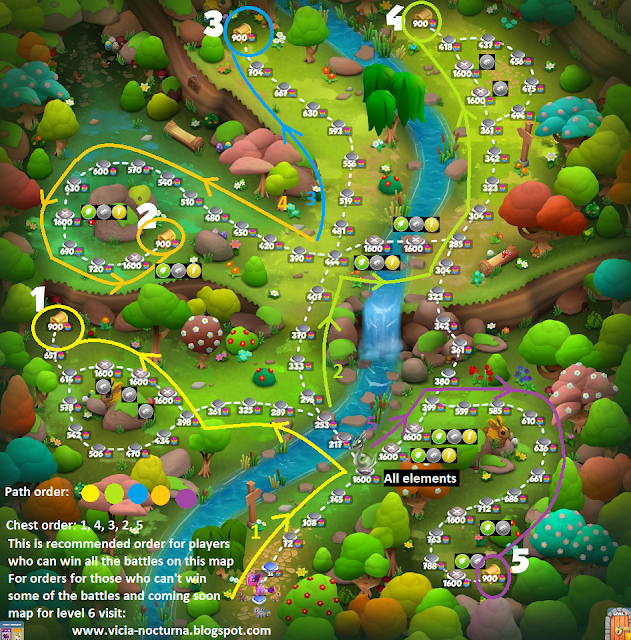
Today I'm showing best routes for level 5 of ongoing event with calculation.
Once again huge thanks go to Silent Grey Eminence for creating the program that calculated best routes and to DML Wiki team for posting the map with tiles costs so that making the calculations was possible.
There were 1440 different routes possible for this map and 2048 different possible costs for each route depending on which battles you were able to win. Once again I had to simplify it, so I made the following assumptions:
- Every player is able to win the battle that allows you to bring any dragons
(if you can't win this battle, it doesn't change your route, but expected cost will be higher by 1600)
- If a player can win a battle with some of his 3 dragons, he can win any other battle that would let him take the same set of dragons.
- Thus, if a player can win battles restricted to metal dragons only, he can win any battle on this map.
- And if a player can win battles restricted to metal or plant dragons only, he can also win battles restricted to metal, plant or energy dragons.
The routes and calculations are below.
For players who can win all the battles on this map:
For players, who can't win battles restricted to metal dragons only, but are able to win all the other battles
For players, who can only win battles that allow to bring plant, metal or energy dragon
The route is the same as for players, who can also win battles restricted only to plant or metal dragons, however the table costs differ a bit:
For players, who can only win all-elements battle
(or can't win any)
Note:
I know that starting from chest 4 seems strange, but just like on map for level 4, it's because of the way that map is drawn. When you look at the numbers, it's perfectly fine.
Important: the paths I have shown are ones that gives you the best chance of getting good overall event score (for the reasons that I mention in the introduction of previous post), but not the cheapest ones. Once you get the key, progress the event, get the Petal Dragon and come back to get all missing Princess pieces, stop following my paths, and choose the cheapest ones instead.
Come back to my blog tomorrow for maps for level 5 :) Have a wonderful day at your Dragonlandia!


Comments
Post a Comment